Categories
scala

Anonymous function in scala

In this post let us learn about the anonymous function in scala.

Anonymous function in scala

Anonymous function is the function without any specific name. It is also called as Lambda function .

Lambda is the word derived from the word lambda calculus which is the  mathematical expression of functional programming.

Basic syntax

To have a little introduction about the functions in scala , go through the previous blog in scala.

The following is the basic syntax to define anonymous function with single parameter.

val a: Int => Int = (x : Int) => x * 2
println(a(3))
6

There are alternative ways for defining the same , the followings are those.

val b = (x : Int) => x * 2
println(b(3))
6

For further information on the syntax of anonymous function in scala

val c = (_:Int) * 2
println(c(3)
6

With multiple parameters

If you have multiple parameters , need to mention the arguments within parenthesis. The below will be the syntax for anonymous function with multiple parameters.

val d: (Int,Int) => Int = (x : Int, y: Int) => x * y
println(d(3,3))
9

With no parameter

In the following example println(e) prints the instance , whereas println(e()) prints the value of the function . We might used to call objects in the former way but for lambda , we must use the latter way.

val e: () => Int = () => 2
println(e())
2

Using Curly braces

The following is the anonymous function defined using curly braces.

val f = { (colour: String) => colour.toInt}

MOAR syntactic sugar

val g: Int => Int = (x: Int) => x+1 — This line is equivalent to the below

val g: Int => Int = _+1
println(g(3))
4

val h: (Int,Int) => Int = (a,b) => a+b — This is equivalent to the below

val h: (Int,Int) => Int = _+ _
println(h(3,3))
6
Categories
aws sqs

sqs consumer in spring boot

In this tutorial, we will learn about sqs consumer in spring boot

AWS offers a Queue data structure with SQS products to produce and consume messages from the queue

SQS stands for Simple Queue Service

Create a spring boot project using spring boot initializr
https://start.spring.io/

Here I am using java 8 with maven.

Prerequisites

  • Queue url
  • access key
  • secret key id
  • SQS region

Dependency

<dependency>
   <groupId>org.springframework.cloud</groupId>
   <artifactId>spring-cloud-aws-messaging</artifactId>
   <version>2.2.4.RELEASE</version>
</dependency>

SQS Config

We need to configure our spring boot application for the SQS producer.
In this class, you have to provide access key id and secret key, and region
Create a new class SQSConfig.java and the below code


import com.amazonaws.auth.AWSCredentialsProvider;
import com.amazonaws.auth.AWSStaticCredentialsProvider;
import com.amazonaws.auth.BasicAWSCredentials;
import com.amazonaws.auth.DefaultAWSCredentialsProviderChain;
import com.amazonaws.regions.Regions;
import com.amazonaws.services.sqs.AmazonSQSAsync;
import com.amazonaws.services.sqs.AmazonSQSAsyncClientBuilder;
import org.springframework.beans.factory.annotation.Value;
import org.springframework.cloud.aws.messaging.config.SimpleMessageListenerContainerFactory;
import org.springframework.cloud.aws.messaging.config.annotation.EnableSqs;
import org.springframework.cloud.aws.messaging.core.QueueMessagingTemplate;
import org.springframework.context.annotation.Bean;
import org.springframework.context.annotation.Configuration;
import org.springframework.context.annotation.Primary;
import org.springframework.core.task.AsyncTaskExecutor;
import org.springframework.scheduling.concurrent.ThreadPoolTaskExecutor;

@Configuration
@EnableSqs
public class SQSConfig {

    @Value("${cloud.aws.region:ap-south-1}")
    private String awsRegion;

    @Value("${cloud.aws.credentials.accessKeyId}")
    private String accessKey;

    @Value("${cloud.aws.credentials.secretKey}")
    private String secretKey;

    @Bean
    @Primary
    public AmazonSQSAsync amazonSQSAsync() {
        return AmazonSQSAsyncClientBuilder.standard()
                .withCredentials(new AWSStaticCredentialsProvider(new BasicAWSCredentials(accessKey, secretKey)))
                .withRegion(Regions.fromName(awsRegion))
                .build();
    }

    @Bean
    public AWSCredentialsProvider credentialsProvider() {
        return new DefaultAWSCredentialsProviderChain();
    }

    @Bean
    public QueueMessagingTemplate queueMessagingTemplate() {
        return new QueueMessagingTemplate(amazonSQSAsync());
    }


    @Bean
    public SimpleMessageListenerContainerFactory simpleMessageListenerContainerFactory(AmazonSQSAsync amazonSQSAsync) {
        SimpleMessageListenerContainerFactory factory = new SimpleMessageListenerContainerFactory();
        factory.setAmazonSqs(amazonSQSAsync);
        factory.setAutoStartup(true);
        factory.setMaxNumberOfMessages(10);
        factory.setTaskExecutor(createDefaultTaskExecutor());
        return factory;
    }

    protected AsyncTaskExecutor createDefaultTaskExecutor() {
        ThreadPoolTaskExecutor threadPoolTaskExecutor = new ThreadPoolTaskExecutor();
        threadPoolTaskExecutor.setThreadNamePrefix("SQSExecutor - ");
        threadPoolTaskExecutor.setCorePoolSize(100);
        threadPoolTaskExecutor.setMaxPoolSize(100);
        threadPoolTaskExecutor.setQueueCapacity(2);
        threadPoolTaskExecutor.afterPropertiesSet();
        return threadPoolTaskExecutor;
    }

}

Message Consumer

With the above configuration, we can start the consumer using  @SqsListener

SQSListener

import org.springframework.cloud.aws.messaging.listener.SqsMessageDeletionPolicy;
import org.springframework.cloud.aws.messaging.listener.annotation.SqsListener;
import org.springframework.stereotype.Component;

@Component
public class SQSListener {

    @SqsListener(value = "${cloud.queue.name}", deletionPolicy = SqsMessageDeletionPolicy.ON_SUCCESS)
    public void processMessage(String message) {
        try {
            System.out.println("RECEIVED MESSAGE --> " + message);
        } catch (Exception e) {
            throw new RuntimeException("Cannot process message from SQS", e);
        }
    }
}

application.properties

cloud.aws.credentials.accessKeyId=***
cloud.aws.credentials.secretKey=***
cloud.queue.name=weather

Output

RECEIVED MESSAGE --> {"message":"1"}

GitHub

https://github.com/rkumar9090/sqs-consumer

Related Articles

Categories
aws sqs

sqs producer in spring boot

In this tutorial, we will learn about sqs producer in spring boot

AWS offers a Queue data structure with SQS products to produce and consume messages from the queue

SQS stands for Simple Queue Service

Create a spring boot project using spring boot initializr
https://start.spring.io/

Here I am using java 8 with maven.

Prerequisites

  • Queue url
  • access key
  • secret key id
  • SQS region

Maven dependency

Add the below dependency in your pom.xml

<dependency>
    <groupId>org.springframework.cloud</groupId>
    <artifactId>spring-cloud-starter-aws-messaging</artifactId>
</dependency>

SQS Config

We need to configure our spring boot application for the SQS producer.
In this class, you have to provide access key id and secret key, and region
Create a new class SQSConfig.java and the below code

@Configuration
public class SQSConfig {
  

    @Value("${cloud.aws.credentials.accessKeyId}")
    private String accessKey;

    @Value("${cloud.aws.credentials.secretKey}")
    private String secretKey;

    @Bean
    public QueueMessagingTemplate queueMessagingTemplate() {
        return new QueueMessagingTemplate(amazonSQSAsync());
    }

    @Bean
    @Primary
    public AmazonSQSAsync amazonSQSAsync() {
        return AmazonSQSAsyncClientBuilder.standard().withRegion(Regions.AP_SOUTH_1)
                .withCredentials(new AWSStaticCredentialsProvider(new BasicAWSCredentials(accessKey, secretKey)))
                .build();
    }
}

Message Producer

With the above configuration, we can start to publish the message to SQS using convertAndSend Method

@Component
public class SQSProducer {

    @Autowired
    private QueueMessagingTemplate queueMessagingTemplate;

    @Value("${cloud.aws.credentials.end-point}")
    private String endpoint;

    public String sendMessage(Pojo message) {
        queueMessagingTemplate.convertAndSend(endpoint,message);
        return "Successfully sent message to SQS";
    }
}

Now you can create one controller and send the message from rest endpoint

@RestController
@RequestMapping("/api/data/")
public class ProducerController {

    @Autowired
    private SQSProducer publisher;

    @PostMapping
    public String sendMessage(@RequestBody Pojo message) {
        return publisher.sendMessage(message);
    }
}

application.properties

cloud.aws.credentials.accessKeyId=****
cloud.aws.credentials.secretKey=*****
cloud.aws.credentials.end-point=https://sqs.ap-south-1.amazonaws.com/978751824592/producer
cloud.aws.region.static.auto=false
cloud.aws.stack.auto=false

If you are facing network issue, add the below snipped in the spring boot main class

@SpringBootApplication(
		exclude = {
				org.springframework.cloud.aws.autoconfigure.context.ContextInstanceDataAutoConfiguration.class,
				org.springframework.cloud.aws.autoconfigure.context.ContextStackAutoConfiguration.class,
				org.springframework.cloud.aws.autoconfigure.context.ContextRegionProviderAutoConfiguration.class
		}
)

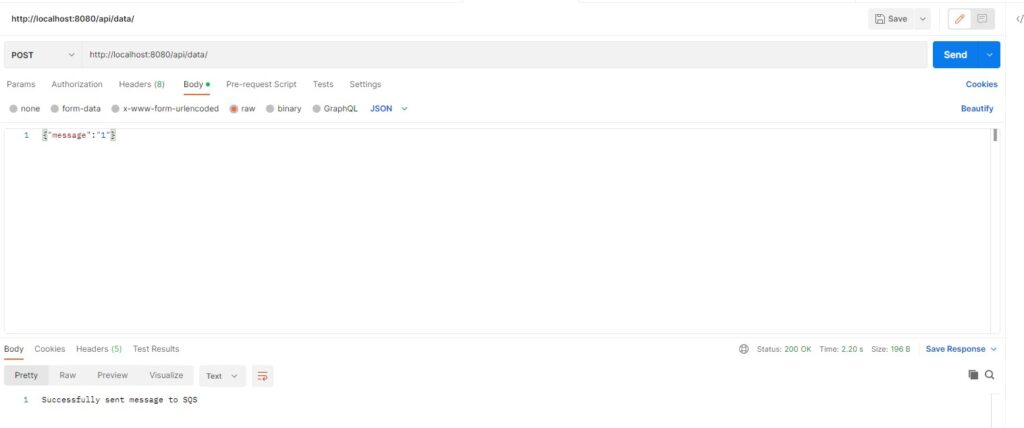
Now you can hit the URL from the postman and you can see the message in SQS AWS console

To Create an access key id and secret key refer to this
https://beginnersbug.com/create-access-key-in-aws-console/

GitHub URL

https://github.com/rkumar9090/sqs-producer

Categories
aws

Create access key in aws console

In this tutorial, we will learn about Create access key in awsconsole

Access key used to create for IAM user or root user. It will consist of two parts

  • access key ID 
  •  secret access key

We can use these keys to sign in to aws programmatically. Below are the steps to create the keys

Navigate to https://aws.amazon.com/, log in with your credentials with the sign in to console option in the top right corner

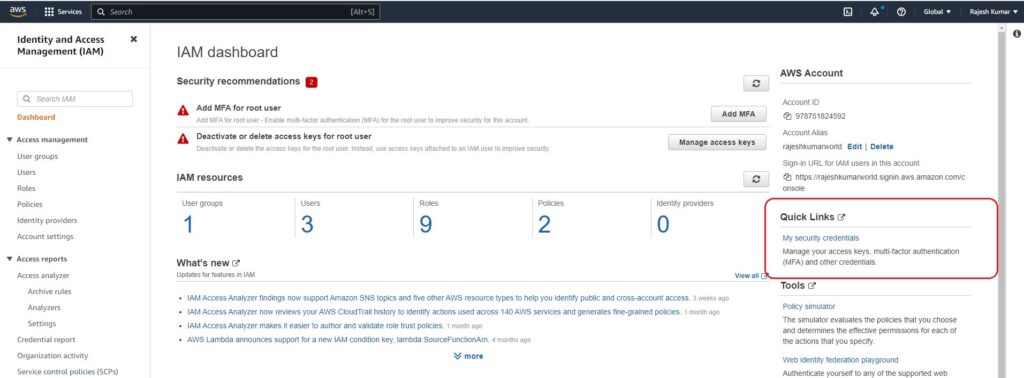
Once you logged in to the console, Search for IAM in the search box as shown below

Select the IAM option from the search result. You will redirect to the IAM management console

Select the My security credentials in Quick links as shown below

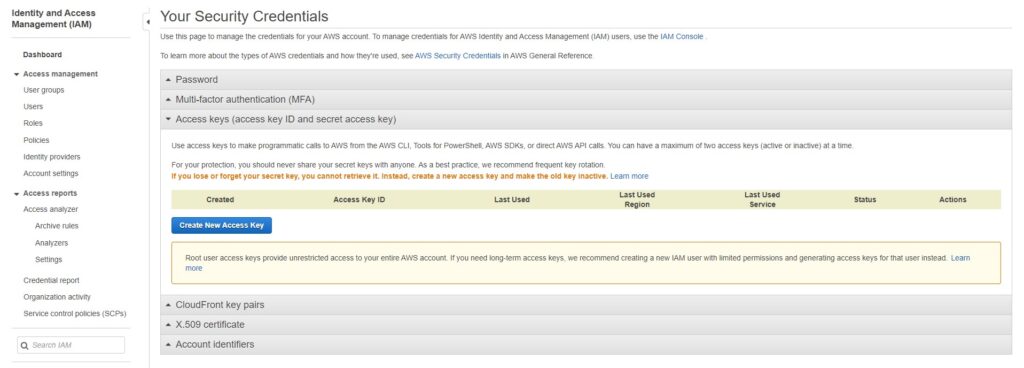
You will be redirect to another window which will have the security crendentials. Select the Access keys (access key ID and secret access key) in that list as shown below

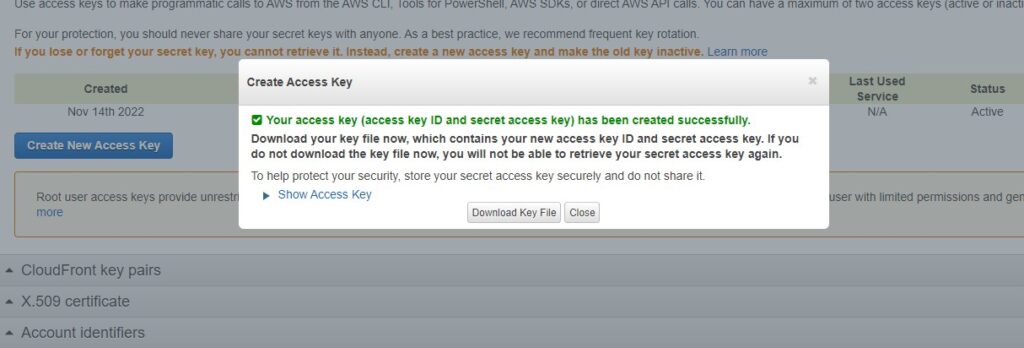
Click on the Create New access key. It will generate the access key and secret key for you.

Copy the keys in the pop up. or download the keys.

Categories
data structures java two pointer

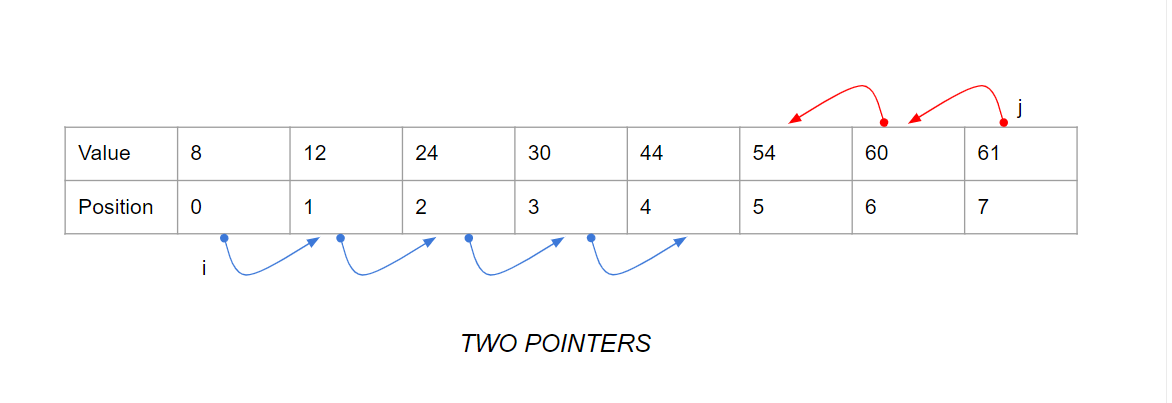
two pointer algorithm

Two pointer algorithm is one of the basic and easy data structures for beginners. It is also commonly asked in most of the interview

In this tutorial, we will learn to apply the two pointer algorithm to find the sum of two numbers in a sorted array

Input

given sorted array
let a = {8 , 12, 24, 30, 44, 54, 60, 61}
sum of two numbers 
let x = 98
Output
44,54

Algorithm explanation

  • The Array should be Sorted in ascending
  • initialize a variable as i with starting position as zero
  • initialize a variable as j with starting position as n-1
  • check the sum of index i & j, if matches then print the value
  • else if the sum is less than the target value then increase the i position
  • else decrease the j position

Example

public class TwoPointersExample {

    private void sumofTwoNumbers(int a[], int x) {
        if (a != null && a.length > 0) {
            int i = 0;
            int j = a.length - 1;
            boolean isFound = false;
            while (i < j) {
                int sum = a[i] + a[j];
                if (x == sum) {
                    System.out.println("The value is " + a[i] + " " + a[j]);
                    isFound = true;
                    break;
                } else if (sum < x) {
                    i++;
                } else {
                    j--;
                }
            }
            if (!isFound) {
                System.out.println("Not able to find with given input");
            }

        } else {
            System.out.println("Not a valid input");
        }

    }

    public static void main(String[] args) {
        int a[] = {8, 12, 24, 30, 44, 54, 60, 61};
        TwoPointersExample example = new TwoPointersExample();
        example.sumofTwoNumbers(a, 98);
        ;
    }
}

Output

The value is 44 54

Related Articles

Categories
scala

callbyvalue and callbyname in scala

In this post let us learn the topic callbyvalue and callbyname in scala.

Generating random number

Will see how to generate random number before starting the topic. This we are going to use in our further code segment .

  val r = scala.util.Random
  println(r.nextInt)
  println(r.nextInt)
  println(r.nextInt)
  println(r.nextInt)
1242716978
868935609
1888491218
-1140363327

callbyvalue

The value computes before invoking the function . And this use the same value whatever it evaluates everywhere the function invokes . In the below example , the value of a remains same while invoking it for two times .

syntax :

function_name(value_name : datatype)  

   val r = scala.util.Random
  callbyvalue(r.nextInt)
    def callbyvalue (a : Long) : Unit = {
      println(" value of a :" +a)
      println(" value of a :" +a)
    }
 value of a :1644239565
 value of a :1644239565

callbyname

Though we pass the expression , the expression evaluates newly at every time it invoked . In the below example , the value of a varies in each time we invoke .

syntax :

function_name(value_name : =>datatype) 

  val r = scala.util.Random
  callbyname(r.nextInt)
  def callbyname (a : => Long) : Unit = {
    println("value of a :" +a)
    println("value of a :" +a)
  }
value of a :761546004
value of a :-892955369

syntax difference

The syntax difference between callbyvalue and callbyname in scala is highlighted below .

function_name(value_name : datatype)  

function_name(value_name : =>datatype

https://beginnersbug.com/values-variables-and-datatypes-in-scala/

Categories
scala

Expressions and functions in scala

In this post , let us learn about the expressions and functions in scala

Expressions

Expressions are the one which gets evaluated  in scala . We have different operators to achieve this .Will look at those below .

Mathematical operators:
+ -> Addition
– -> Subtraction
* -> Multiplication
/ -> Division
& -> bitwise AND
| -> bitwise OR
^ -> bitwise exclusive OR
<< -> bitwise left shift
>> -> bitwise right shift
>>> -> right shift with zero extension only in scala

Relational operators:
== -> Equal to
!= -> not equal to
> -> greater than
>= -> greater than or equal to
< -> lesser than
<= -> lesser than or equal to

Boolean operators :
! -> negation(unary operator)
&& -> logical AND(binary operator)
|| -> logical OR(binary operator)

other operators:

+= , -= , *= , /=

Functions

Following is the function used for adding two values .

def – keyword

a and b – parameters

Int – data type (First letter must in capital)

1. Normal function :
def func (a: Int, b: Int ): Int =
  {
    a + b
  }
  println(func(20,10))
30

Its not mandatory to provide return type in the case of normal function . Below is the way I tried without any return type .

def func (a: Int, b: Int ) =
  {
    a + b
  }
  println(func(20,10))
30
2. Function without parameter

Function can also be without any parameter as like below .

// invoking with parenthesis   
def func1 () : Int =42
   println(func1())
42

Other way to invoke parameterless function in scala is the below option.

// invoking without parenthesis
def func1 () : Int =42
   println(func1)
42
3.Recursive function

A function gets called continuously by itself .

def func1(a: String ,b: Int) : String = {
    if (b==1)  a
    else a + (func1("Success",b-1))
  }
  println(func1("Success", 5))
SuccessSuccessSuccessSuccessSuccess

We must specify the return type for this .

def func1(a: String ,b: Int) = {
    if (b==1)  a
    else a + (func1("Success",b-1))
  }
  println(func1("Success", 5))
identifier expected but '=' found.
    def func1(a: String ,b: Int) :  = {
Categories
scala

values variables and datatypes in scala

In this post , let us learn about values variables and datatypes in scala .

Values

Values are immutable which cannot be modified . In the below example , ValuesVariablesTypes is the object created for this tutorial .

  • val – keyword (only in lower case) .
  • Int – datatype  
object ValuesVariablesTypes extends App {
    val x : Int = 43 ;
    print(x)
}
43
Process finished with exit code 0

We are trying to modifying the value in the below case . It failed with reassignment error . Hence this immutable feature will not allow us to modify the values .

object ValuesVariablesTypes extends App {
    val x : Int = 43 ;
    print(x)
    x = 44 ;
}
reassignment to val
    x = 44 ;

It is not mandatory to specify the datatype as compiler can infer datatypes automatically . And so it worked for the below case also .

object ValuesVariablesTypes extends App {
    val x = 43 ;
    print(x)
}
43
Process finished with exit code 0

Datatypes

Few of the main datatypes along with ways to specifying as follows

Datatype specify with datatype specify without datatype
String val a : String = “Hello” val a = “Hello”
Boolean val b : Boolean = false val b = false
Char val c : Char = ‘ abc’ val c = ‘ abc’
Short(2bytes of length ) val d : Short =7416 val d = 7416
Long(4bytes of length ) val e : Long = 74167416 val e = 74167416
Long (for more than 4 bytes) val f : Long = 7416741674167416L val f = 7416741674167416L
Float val g : Float = 14.0f val g = 14.0f
Double val h : Double = 3.63 val h = 3.63

Variables

Variables can be modified which is the difference between values and variables .

object ValuesVariablesTypes extends App {
    var Y = 43 ;
    println(Y)
    Y = 44 ;
    print(Y)
}
43
44
Process finished with exit code 0

Hope this post gives an idea about values variables and datatypes in scala .

Categories
spark

spark submit options

In this post , let us get to know about spark submit options .

spark submit options

spark submit options mentioned below contain < > .We can replace them with respective values . Following are the few of the prominent spark submit options available .

Everything will contain option name and its values . For instance , — master is the option name and can pass value next to it .

spark-submit \
--master < > \
--deploy-mode < > \
--keytab < > \
--principal < > \
--driver-memory < > \
--executor-memory  < > \
--executor-cores  < > \
--num-executors  < > \
--class  < > \
<jar name>
--conf <key>=<value> 

master : It is suitable for local mode

deploy mode : default – client

This is applicable only for cluster set up – YARN , standalone . It can have client or cluster as the value . It depends on where driver program needs to run . That is on worker node (cluster mode ) or local machine (client mode) .

keytab and principal : 

Every host that provides a service must have a local file, called a keytab . This file contains the pairs of Kerberos principals and encrypted keys. It allow scripts to authenticate using Kerberos automatically . Without any  involvement of human while accessing the password stored in a file.

driver-memory : Memory required for driver program which enclose the main method . The default value is 1 GB 

executor-memory : Executors are worker nodes responsible for running individual tasks in a given Spark job . Memory allocated for each executor which could be assigned based on some calculation.

executor-cores : Number of cores each executor can have.

num-executors : Specify the number of executors to have .Running executors with too much memory often results in excessive garbage collection delays.
Whereas running tiny executors throws away the benefits that come from running multiple tasks in a single JVM. (with a single core and just enough memory needed to run a single task, for example) . It is better to calculate before assigning .

class : class file name 

Other options :

–conf <key>=<value>

For instance , –conf spark.sql.files.maxPartitionBytes = 128

spark.sql.files.maxPartitionBytes : default (128 MB)
spark.sql.files.openCostInBytes : default (4 MB)
spark.sql.files.minPartitionNum
spark.sql.broadcastTimeout : default (300)
spark.sql.autoBroadcastJoinThreshold : default (10 MB)
spark.sql.shuffle.partitions : default (200)
spark.sql.sources.parallelPartitionDiscovery.threshold : default (32)
spark.sql.sources.parallelPartitionDiscovery.parallelism : default (10000)

Reference

https://spark.apache.org/docs/latest/sql-performance-tuning.html#other-configuration-options

Categories
Go

array in go lang

In this post, we will learn about array in go lang

In my previous tutorial, I have explained the installation of Go in windows. Please check out the below URL for that.
https://beginnersbug.com/install-go-lang-in-windows/

Arrays are basic in all programming languages which is used for data operations. We can have a collection of elements here.

Creating array in Go lang

Similar to other programming languages, we can create arrays with length and without length.

In the below example I created two arrays with indexes of 5 & 3 with the datatype of int and string

package main

// fmt package for user input & output
import "fmt"

// Main Method
func main() {
	// Creating an int array with index of 5
	var intarr = [5]int{10, 4, 6, 2, 12}
	// Creating an string array with index of 3
	var strarr = [3]string{"Iron Man", "Hulk", "Thor"}
	// Printing arrays
	fmt.Println(intarr)
	fmt.Println(strarr)
}

Output

[10 4 6 2 12]
[Iron Man Hulk Thor]

Printing index of array

In the below example, we will print the element based on the index value.
Here we are printing element at index intarr(1) & strarr(2)

package main

// fmt package for user input & output
import "fmt"

// Main Method
func main() {
	// Creating an int array with index of 5
	var intarr = [5]int{10, 4, 6, 2, 12}
	// Creating an string array with index of 3
	var strarr = [3]string{"Iron Man", "Hulk", "Thor"}
	// Printing arrays
	fmt.Println(intarr)
	fmt.Println(strarr)

	// Printing index of an array
	fmt.Println(intarr[1])
	fmt.Println(strarr[2])
}

Output

[10 4 6 2 12]
[Iron Man Hulk Thor]
4
Thor

The below snippet will show you to print the length of an array.
len() method is used to print the length of the array

package main

// fmt package for user input & output
import "fmt"

// Main Method
func main() {
	// Creating an int array with index of 5
	var intarr = [5]int{10, 4, 6, 2, 12}
	// Creating an string array with index of 3
	var strarr = [3]string{"Iron Man", "Hulk", "Thor"}
	// Printing arrays
	fmt.Println(intarr)
	fmt.Println(strarr)

	// Printing index of an array
	fmt.Println(intarr[1])
	fmt.Println(strarr[2])

	fmt.Println("Lenght of int array:", len(intarr))
	fmt.Println("Lenght of string array:", len(strarr))
}

Output

[10 4 6 2 12]
[Iron Man Hulk Thor]
4
Thor
Lenght of int array: 5
Lenght of string array: 3

Iterate array using for loop

Here we are printing each and every element with the help of for loop

package main

// fmt package for user input & output
import "fmt"

// Main Method
func main() {
	// Creating an int array with index of 5
	var intarr = [5]int{10, 4, 6, 2, 12}
	// Creating an string array with index of 3
	var strarr = [3]string{"Iron Man", "Hulk", "Thor"}
	// Printing arrays
	fmt.Println(intarr)
	fmt.Println(strarr)

	// Printing index of an array
	fmt.Println(intarr[1])
	fmt.Println(strarr[2])

	fmt.Println("Lenght of int array:", len(intarr))
	fmt.Println("Lenght of string array:", len(strarr))

	// Iterating array using for loop
	for i := 1; i < len(intarr); i++ {
		fmt.Print(intarr[i], " ")
	}
	fmt.Println()
	// Iterating array using for loop
	for i := 0; i < len(strarr); i++ {
		fmt.Print(strarr[i], " ")
	}

}

Output

[10 4 6 2 12]
[Iron Man Hulk Thor]
4
Thor
Lenght of int array: 5
Lenght of string array: 3
4 6 2 12 
Iron Man Hulk Thor

Go lang play

You can play with the array using their playgrounds also https://go.dev/tour/moretypes/6